 SecurityArchitecture.com
Getting and Installing Tools
One advantage to installing Snort on Windows is that the process requires only three primary components: the WinPcap packet capture utility, the Snort installer, and a set of Snort rules. If syslog output is the goal then installing a separate syslog server is a fourth requirement. These requirements are summarized in the table below, followed by retrieval and installation instructions for each component.
| Snort requirements (you need these to be able to install Snort on Windows) |
Installation packages:
|
Anytime you are going to be downloading multiple installer files or packages, it’s a good idea to settle on a standard place to put them. These instructions assume files will be downloaded directly from the relevant web sites where they are available. Many web browsers use the Downloads folder associated with each Windows user, which is an acceptable approach, although if your system has lots of things in the Downloads folder you might consider setting up a separate sub-folder for the packages associated with Snort.
Let’s begin with retrieving files from www.snort.org. There are two things we want to download: the Snort installer package and the rules files.
- Get the latest version of Snort by browsing to https://www.snort.org/downloads and clicking on the link for the Windows installer: Snort_2_9_20_Installer.x64.exe
- Get the latest version of the rules by browsing to https://www.snort.org/downloads/#rule-downloads and clicking on the link for the current Registered User release: snortrules-snapshot-29200.tar.gz
Note that you must create an account (which is free) and log in to Snort.org in order to download the “registered” rules file or purchase an annual subscription to download the “subscriber” rules file. The “community” version of the the rules is free and requires no user registration, but if you choose to use the community rules there are changes you must make to the snort.conf configuration file because the rules referenced in the configuration reflects the structure of the registered or subscriber rulesets.
- Get the WinPcap installer by browsing to http://www.winpcap.org/install/default.htm and clicking on the link for the Version 4.1.3 installer for windows (http://www.winpcap.org/install/bin/WinPcap_4_1_3.exe).
Now install the programs (in the case of WinPcap and Snort) and extract the rules files (in the case of the Snort rules package). It is recommended that WinPcap is installed before Snort, but it is not required; at the end of the Snort installation process the program will prompt that you need to install WinPcap, whether or not the utility is already installed. If you have installed any other programs that rely on packet capture, such as Wireshark, then you will already have WinPcap installed and you can skip the first step below.
- Double-click the WinPcap_4_1_3.exe installer file and follow the on-screen prompts. Typically no customization or configuration is required for this install, although on many systems a restart may be required to make sure the WinPcap netgroup packet filter (NPF) driver is running.
- Double-click the Snort_2_9_20_Installer.x64.exe file and follow the on-screen prompts.
- Accept the license agreement
- Choose the components (Snort, dynamic modules, documentation) you want to install. All are selected by default. Documentation is not strictly required for our purposes if space is at a premium (the space required to install is reduced by about 50% if documentation is unchecked).
- By default the installer creates a root directory for Snort at c:\Snort, although you can specify a different directory if desired. When you select “Next” the installation executes.
- At the end of the installation, the program displays a message that Snort has successfully been installed. The message includes a note that WinPcap is required (it refers to 4.1.1 although 4.1.3 is the current version), recommends tightening security on Snort, and directs you to edit the snort.conf file. Note that in generally, WinPcap has been supplanted by npcap, and many sources of technical guidance on Snort refer to this newer version (WinPcap was last updated in 2018). Many Windows users have encountered issues with npcap when it comes to Snort functions like listing available network interfaces, so if you are just learning about Snort, you might have a better experience with WinPcap.
- Open the Snort rules package. Depending on your operating system, Windows may be able to open the zipped archive automatically, or you can use a utility such as WinZip, 7Zip, or WinRAR to open it.
- Create a subfolder under c:\Snort called rules, and another called preproc_rules.
- Extract the contents of the rules folder in the archive to c:\Snort\rules
- Extract the contents of the preproc_rules folder in the archive to c:\Snort\preproc_rules
- Ignore the so_rules folder; while Sourcefire offers pre-compiled versions of the shared object rules for many Linux distributions, no such option exists for Windows. Compiling the Snort shared object rules to run on Windows is well beyond the technical scope of this course.
- Also ignore the contents of the etc folder in the archive.
Once you have completed installing these components, you can check to see if the program responds:
- Change to the Snort program directory: c:\>cd \Snort\bin
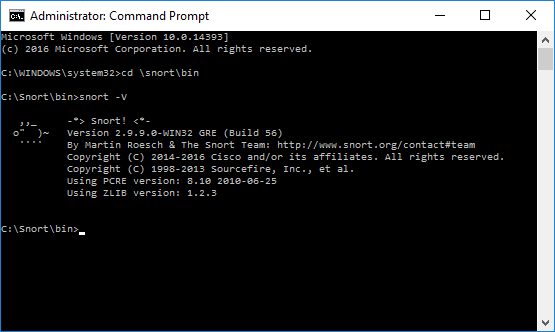
- Check the installed version for Snort: c:\Snort\bin>snort –V
- The -V option (it must be a capital V) simply returns the current installed version of the program. If Snort is installed on the system, you should see something similar to the screenshot below (which shows an installed version 2.9.9.0):
- You should also check to see what network adapters are on your system, so you can tell Snort to listen on the appropriate interface when it runs. To see a list of interfaces, run the command: C:\Snort\bin>snort -W
On current Windows systems there will be at least two (Ethernet and wireless), three if there is a modem in the computer, and four or more depending on what additional software is installed on the computer. If both wired and wireless network interfaces are active, you should disable one before you try to run Snort, since Windows offers no way to direct a program to use a specific interface when multiple connections are available. Record the number of the interface you will use (the instructions below assume the interface number is 2; substitute the appropriate number for your computer when using the -i option in Snort start-up commands.
The next thing to do is to edit the snort.conf file to make it reflect the environment where your computer is running (see Configuring Snort with snort.conf). You should make sure that when you edit the file, you are working on the one in c:\Snort\etc (and not any other versions that may exist in temporary or download directories).